

Understanding Label Orientation: Complete Guide to Labels on Rolls
31st Jan 2026
Understanding Label Orientation: A Complete Guide to Labels on Rolls for Your Business
When ordering blank label rolls or custom printed labels for your products, understanding label orientation is crucial for ensuring seamless production and professional results. Whether you're using a desktop label printer for small batches or an automated label applicator for high-volume manufacturing, the way your labels are positioned on the roll directly impacts print quality, application efficiency, and overall packaging appearance. This comprehensive guide explains everything you need to know about how labels on rolls work, how to measure them correctly, and why orientation matters for your specific application.
What Is Label Orientation and Why Does It Matter?
Label orientation refers to the position of your labels as they wind around the roll and feed through printing or application equipment. Each label has two primary dimensions: width (the measurement across the roll) and height (the measurement around the roll as it wraps). Understanding this distinction is essential because a 4" x 3" label is fundamentally different from a 3" x 4" label when mounted on a roll, even though both cover the same surface area.
The orientation becomes particularly critical when using automated equipment. If your label roll orientation doesn't match your applicator's configuration, your labels will be applied sideways or upside down, resulting in wasted materials, production delays, and potentially unusable products. For businesses using manual application, orientation is less critical since you can rotate the label by hand, but understanding the dimensions still ensures you order the correct specifications for your design layout.
How to Read Label Dimensions: Width x Height Explained
Labels on rolls follow an industry-standard sizing convention: Width x Height. The first number always represents the width (across the roll), and the second number represents the height (around the roll). This standard applies universally across label manufacturers and suppliers.
For example:
- A 4" x 6" label means 4 inches across the width of the roll and 6 inches in height as it wraps around
- A 6" x 4" label means 6 inches across the width and 4 inches in height
- A 2" x 1" label means 2 inches wide and 1 inch tall on the roll
- A 2" x 1" 2UP label, means there are two labels across the width of the roll 2 inches wide and 1 inch tall on the roll
Figure 1: Standard label sizing showing width across the roll and height around the roll. Notice how 4" x 6" and 6" x 4" labels have different orientations despite having the same overall dimensions.
Anatomy of a Label Roll: Key Measurements You Need to Know
Understanding the complete anatomy of your label roll ensures compatibility with your equipment and helps you calculate how many labels you'll get per roll. Here are the critical measurements:
Figure 2: Detailed diagram showing label roll components including label width, label height (or length), core size, outer diameter, and carrier width.
Key Label Roll Specifications:
- Label Width: The measurement across the label from left to right (across the roll)
- Label Height (or Length): The measurement from the top to bottom of the label as it feeds off the roll
- Core Size: The diameter of the cardboard core in the center of the roll (typically 1", 3", or 76mm)
- Outer Diameter (OD): The total diameter of the roll including all labels
- Carrier/Liner Width: The width of the backing paper (usually 1/8" wider than the label on each side)
- Gap: The space between labels on the roll (typically 1/8" or 3mm)
Visualizing Label Orientation: Width vs. Height on the Roll
To better understand how labels on rolls work, visualize the roll standing upright on your desk. The labels feed from the top or front of the printer/applicator with the width as the leading edge.
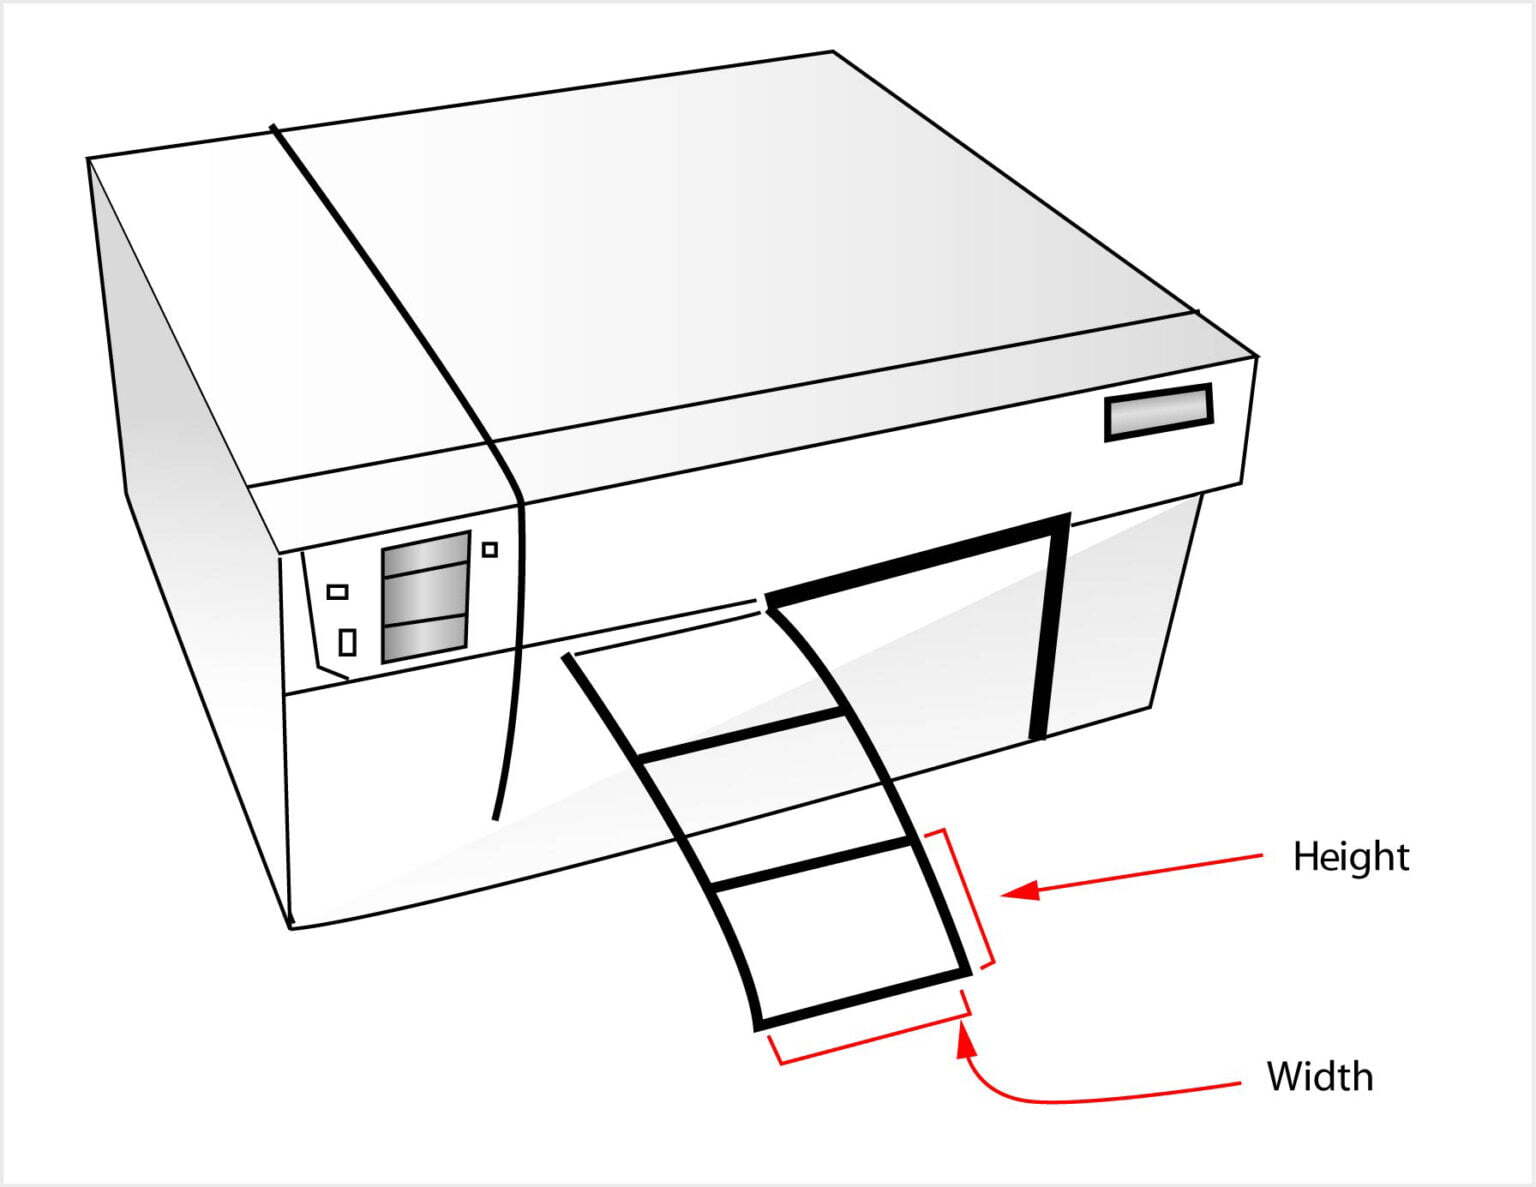
Figure 3: Visual representation showing label width across the roll and label height (length) as the label feeds forward. This is how labels are positioned in most thermal and inkjet label printers.
In this standard configuration:
- The width spans horizontally across the face of the roll
- The height extends vertically down the roll as it wraps around
- Labels peel off with the width edge feeding first into the printer or applicator
Why Label Orientation Is Critical for Label Applicators
When using a label applicator machine, orientation becomes absolutely critical. These machines are designed to apply labels at specific angles and positions, and they expect the label to feed in a particular direction. If your roll orientation doesn't match the machine's requirements, you'll experience:
- Misaligned labels: Text and graphics applied sideways or upside down
- Application failures: Labels not adhering properly to containers
- Production downtime: Stopping to reconfigure equipment or reorder labels
- Material waste: Ruined labels and potentially damaged products
Understanding Applicator Orientation
Label applicators typically position products horizontally or vertically, and the label must match this orientation. Consider this common scenario with wine bottles:
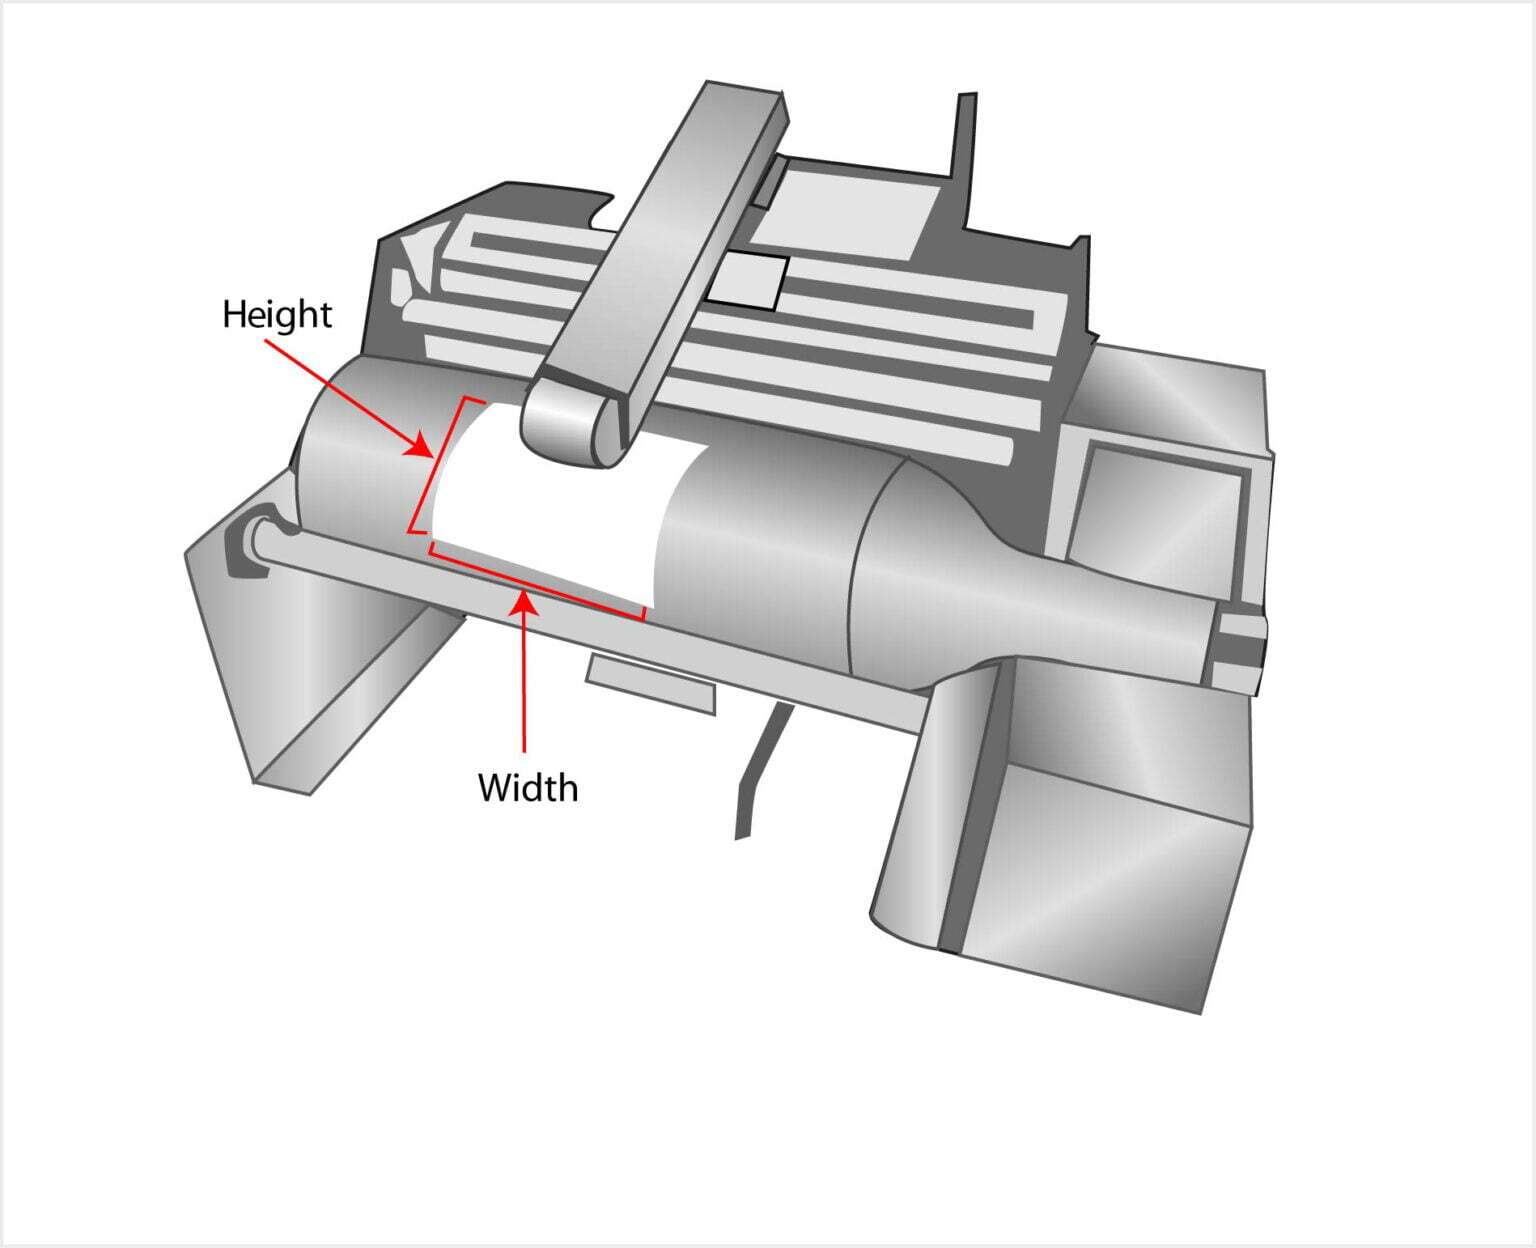
Figure 4: Automatic label applicator machine showing the labeling, and how labels feed from the roll onto products. The orientation of the label on the roll must match the orientation required by the applicator mechanism.
In a typical wine bottle labeling setup:
- The bottle lays horizontally in the applicator
- The label applies with the width becoming the height on the bottle
- If you need a label that wraps 4" around the bottle and stands 3" tall, you need a 3" x 4" label on the roll (3" width feeds first, becomes 3" height on bottle, 4" height on roll wraps around)
Wait, let's clarify that with a practical example:
If your wine bottle requires a label that is 4 inches tall (from top to bottom of the bottle) and 3 inches wide (wrapping around the circumference), and the bottle lays on its side in the applicator:
- The width of the label on the roll (the leading edge) becomes the height on the bottle
- Therefore, you need a 4" x 3" label on the roll (4" width x 3" height)
- The 4" width feeds first and becomes the 4" height on the bottle
- The 3" height on the roll wraps around as the 3" width on the bottle
Common Label Orientation Scenarios
Scenario 1: Standard Product Labels (Hand Application)
For products like boxes, jars, or bottles that you label by hand, orientation is flexible. You can rotate the label as needed. However, ordering the correct orientation ensures your design prints in the right direction relative to the label's shape. A rectangular 2" x 6" label oriented as landscape (2" height x 6" width) looks very different from portrait orientation (6" height x 2" width).
Scenario 2: Thermal Transfer or Direct Thermal Printing
When using desktop thermal printers like Zebra, Godex, or TSC models, the label feeds with the width as the leading edge. Your label design software should match this orientation. If you have a 4" x 6" shipping label, the 4" edge feeds into the printer first, and the 6" length extends out the front.
Scenario 3: Inkjet Color Label Printers
Color label printers like the Afinia L502, Epson ColorWorks, or Primera models also feed labels with the width leading. However, these printers often have different maximum width capacities (typically 8" or 8.5" maximum). Understanding your label dimensions ensures you don't order labels too wide for your printer.
Scenario 4: Automated Wrap-Around Labeling
For cylindrical products like bottles, cans, or vials that require full or partial wrap-around labels, the height of the label on the roll determines how far the label wraps around the product. If you need a label that wraps 8" around a large container, the label height on the roll must be 8", meaning you might order a 4" x 8" label (4" wide across the roll, 8" tall around the roll).
How to Determine the Correct Label Orientation for Your Application
Follow these steps to ensure you order labels with the correct orientation:
- Measure Your Product: Determine the exact dimensions of the area where the label will be applied (width and height as it will appear on the product).
- Determine Application Method: Will you apply by hand or use a machine? If using a machine, check the manufacturer's specifications for label feed direction.
- Visualize the Feed Direction: Determine which edge of the label will feed first into your printer or applicator. This becomes your "width" on the roll.
- Calculate Roll Dimensions:
- The dimension feeding first = Width (first number)
- The dimension following behind = Height (second number)
- Consider Printer Limitations: Ensure the width doesn't exceed your printer's maximum media width, and the height works with your printer's sensor capabilities.
Tips for Ordering Labels with the Correct Orientation
- Always specify dimensions as Width x Height: This industry standard prevents confusion.
- Request a diagram: When ordering custom labels, ask your supplier to provide a diagram showing the orientation on the roll.
- Order samples first: Before committing to a large quantity, order a small roll to test in your equipment.
- Check core size compatibility: Ensure the roll's core diameter (1", 3", etc.) fits your printer or applicator mandrel.
- Consider roll diameter: Larger rolls hold more labels but may not fit in compact desktop printers. Standard outside diameters are 4", 6", or 8".
- Label direction matters too: Labels can be wound "inside wound" (labels facing inward) or "outside wound" (labels facing outward). Most desktop printers require outside wound.
Troubleshooting Common Label Orientation Problems
Problem: Labels are printing sideways
Solution: Your software settings don't match your physical label orientation. Rotate your design 90 degrees in your label software, or reorder labels with swapped dimensions (e.g., change from 4" x 3" to 3" x 4").
Problem: Label applicator is applying labels crooked
Solution: Check that the label width on the roll matches the applicator's feed mechanism. The applicator may be expecting a different leading edge dimension.
Problem: Labels don't fit in the printer
Solution: Verify that the label width (first dimension) is less than your printer's maximum media width. Also check that the roll's outside diameter fits within the printer's roll holder capacity.
Problem: Barcodes won't scan after application
Solution: Ensure the barcode is oriented so that the bars run perpendicular to the label's feed direction (sometimes called "picket fence" orientation vs. "ladder" orientation). Some scanners have trouble reading barcodes that are too vertical relative to the label feed.
Conclusion: Mastering Label Orientation for Perfect Results
Understanding label orientation on rolls is fundamental to successful label printing and application. By remembering that dimensions are always expressed as Width x Height (width across the roll, height around the roll), you can avoid costly mistakes and production delays. Whether you're hand-applying product labels or running high-speed automated packaging lines, taking the time to visualize how your labels feed from the roll ensures your finished products look professional and your operations run smoothly.
At OmegaBrand, we specialize in helping businesses select the perfect custom label solutions for their specific equipment and application needs. Our team can provide detailed diagrams, sample rolls, and expert consultation to ensure your labels are oriented correctly for your printers and applicators. Contact us today to discuss your project and receive a free orientation assessment for your label requirements.
Need help determining the right label orientation for your specific printer or applicator? Our label experts are standing by to assist. Call us or chat online for immediate support.